Estimated reading time: 1 minute
How To Do The Supported Single Leg Deadlift (SLDL)
If you’ve ever tried a single-leg deadlift (SLDL) and felt like you might topple over, don’t worry, you’re not alone. That’s where the “supported” part comes in. It’s like training wheels for your balance, helping you nail the form and reap the rewards of this hip dominant exercise without the risk of a faceplant.
What Does Supported Mean or Hand Assisted Mean?
Think of it like this: Imagine using a training stick from Stick Mobility. You can rest your hand opposite your “working leg” on it for extra stability. This slight assist lets you focus on hinging at the hips, engaging your core, and driving your heel into the ground.
What Muscles Are Worked in the Single Leg Deadlift?
SLDLs are a fantastic exercise for building strength, balance, and stability in your hips and lower body. They target your hamstrings, glutes, spinal erectors, core and lower back, making them an excellent choice for athletes and anyone looking to improve their fitness and progress their single leg deadlifts.
Primary Muscles Worked:
- Hamstrings: Semitendinosus, Semimembranosus, Biceps Femoris
- Glutes: Gluteus Maximus
Secondary Muscles Worked:
- Lower Back: Erector Spinae
- Core: Transverse Abdominis, Obliques
- Calves: Gastrocnemius, Soleus
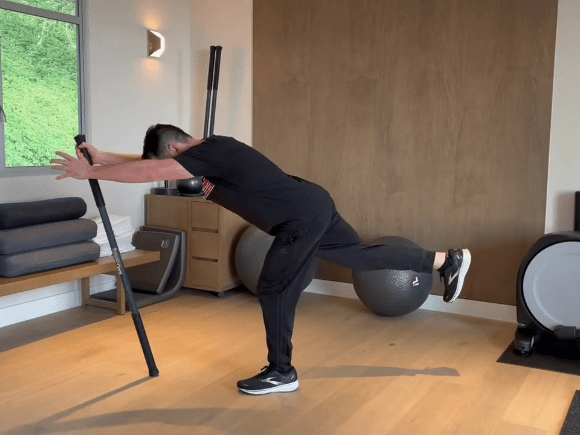
How to Perform the Supported Single Leg Deadlift
Time needed: 1 minute
Exercise Description:The supported single-leg deadlift is a unilateral exercise that challenges your balance and strength, primarily targeting your hamstrings and glutes.
- Grab Your Prop:
Whether it’s a dowel, a Stick Mobility Training Stick, or even a sturdy broomstick, have it ready.
- Stand Tall:
Start in an upright position with your feet hip-width apart.
- Activate Your Core:
Brace your core by using the nasal breathing breathing technique.
- Stand on One Foot:
Raise one foot off the ground. The leg/foot that’s on the ground should have a slight bend or “soft knee.” Your glutes should be activated.
- Hinge Forward Extending Your Leg, Lowering Your Trunk:
Simultaneously, hinge at your hips, pushing your butt back while lowering your torso towards the ground. The leg your lifting should move straight behind you with your hips parallel to the floor and while keeping your back flat.
- Pause at the Bottom:
Hold momentarily at the bottom of the movement.
- Return to Starting Position:
Drive through your heel to return to the starting position
- Repeat on the Other Side:
Complete the same number of reps on your other leg.
Pro Tips:
- Keep Your Back Flat: Avoid rounding your back, which can lead to injury.
- Focus on Your Form: Prioritize quality over quantity.
- Start Light & Progress Gradually: Begin with lighter or bodyweight weights to master the technique.
- Remember Your Non-Working Leg: Keep your glute engaged throughout the movement.
- Remember Your Working Leg: Maintain a “soft knee” for glute activation and think about “pushing your foot through the floor.”
Use this exercise as a foundation for your single-leg training, incorporating it into your deadlift variations for a month before progressing to the more challenging Unsupported Reaching Single-Leg Deadlift.
3 Best Supported SLDL Progressions
- Add Weight and Reach: Introduce a weighted vest and a unilateral arm reach.
- Reduce Support: Gradually decrease reliance on support, progressing to an unsupported SLDL with a bilateral arm reach.
- Increase Challenge: Add a dumbbell or kettlebell to the hand opposite your working leg.
Final Thoughts
All in all supported SLDL’s are one of my favorite ways to improve hip strength, motor skills, balance and stability. So grab your prop and get lifting!
Latests Posts
- How Can Personal Training Help You Reach Your Goals in Los Angeles?
- Who Should Work With a Personal Trainer in West Hollywood?
- Why Is Personal Training Worth It In a Private Gym?
- How Often Should You See a Personal Trainer: Frequency Tips for Best Results in Personal Training
- What Should Beginners Know About Personal Training: Tips for Success in Your First Session

")

![Full Body Kettlebell Workout [PDF] | Body360 Fit](https://body360fit.com/wp-content/uploads/2021/01/Full-Body-Kettlebell-Workout-PDF.png)