
Estimated reading time: 9 minutes
Bear Crawl Exercise Benefits
It’s true the Bear Crawl Exercise Benefits are diverse and performing this exercise could possibly make you as strong as a grizzly bear. Well, that’s not entirely true. According to A-Z Animals, grizzlies are massively strong bearing the strength of approximately five human adults. I think you get my point—bears are strong and you should be too!
All kidding aside, the bear crawl is a versatile exercise that offers a comprehensive full-body workout, targeting 7 key benefits: upper body strength, lower body strength, core stability, shoulder health, motor control, reflexive stability, and improved scapular stability.
Ready to unleash your inner bear? This article dives into different variations of the bear crawl, each offering a unique challenge and further maximizing the benefits. We’ll cover exercises like the 4-point bear plank, 6-point bear crawl, and even explore ways to increase difficulty with weighted vests and resistance chains.
So I ask you, Bear Crawl Exercise Anyone? They’re not easy, but they’re effective!
Key Takeaways:
In this article, I break down the following:
- What is The Bear Crawl Exercise?
- 7 Benefits of The Bear Crawl Exercise Plus Muscles Worked
- How to do a Perfect Bear Crawl with Proper Form and Technique Every Time
- The 5 Bear Crawl Variations for Progression
- How to Integrate the Bear Crawl Into Your Workout Program
- Bear Crawl Workout (PDF): Get The Workout HERE!

What Is The Bear Crawl Exercise?
The bear crawl exercise is a bodyweight exercise implemented to help build strength in one of the most fundamental positions. Think about it, infants begin to crawl instinctively as they perform this developmental movement pattern with 6 points of contact (hands, knees and feet) before progressing to the more advanced 4 point bear crawl position (hands and feet).

With this in mind, we see this 6 point and then 4 point movement pattern as a baby learns to crawl and then taper off as toddlers and move into childhood, adolescence and adulthood.
It’s in the later stages of development that we rarely crawl, but instead stand and walk.
Unfortunately, as we grow older we spend less time in these positions and ultimately lose our ability to access the motor control of this movement pattern altogether. In turn, we lose reflexive core stability and strength as well, which can present itself as low back pain in some individuals.
Let’s take a quick look at these developmental stages.
Stages of Human Development and Movement
- Infancy : up to 1 year of age
- Toddler: 1 -5 years of age
- Childhood: 3 – 11 years of age
- Adolescence or teenage: 12 – 18 years of age
- Adulthood: 18 and above
Here’s How It Looks
Here’s a great visual of the Stages of Human Development ranging from baby to elderly from the Phoenix – My Child Abuse Recovery Journal.
In other words, you need to maintain your ability to crawl by including the bear crawl exercise in your weekly workout program.
7 Benefits Of The Bear Crawl Exercise Pattern Plus Muscles Worked
In addition to working your upper body muscles (chest, shoulders, back and upper arms) and lower body muscles (glutes, quads, hamstrings and calves), this crawling exercise can also improve cardiovascular fitness and strengthen your deep core muscles. Simply put—the Bear Crawl is a great way to build more core strength.
Benefits:
- Works Upper Body Muscles (Chest, Shoulders, Back and Arms)
- Works Lower Body Muscles (Glutes, Quads, Hamstrings and Calves)
- Improves and Maintains Shoulder and Scapular Stability
- Improves and Maintains Motor Control
- Builds Core Strength
- Improves Core Stability
- Develops Reflexive Stability
Reflexive Stability: Reflexive stability refers to your body’s ability to access motor control or sequencing of a particular action. Reflexive stability is crucial to reduce the risk of injury in the gym and everyday life.
Muscles Worked:
Here’s a list of the deep core muscles that activates reflexive stabilty:
- Rectus Abdominus
- Internal Obliques
- External Obliques
- Transverse Abdominus
- Diaphragm
- Pelvic Floor Muscles
- Quadaratus Lumborum
- Multifidus
- Erector Spinae
Bear Crawl Exercise Proper Technique & Form – 4 Point Variation
Time needed: 1 minute
How to properly do a Traditional Bear Crawl Exercise
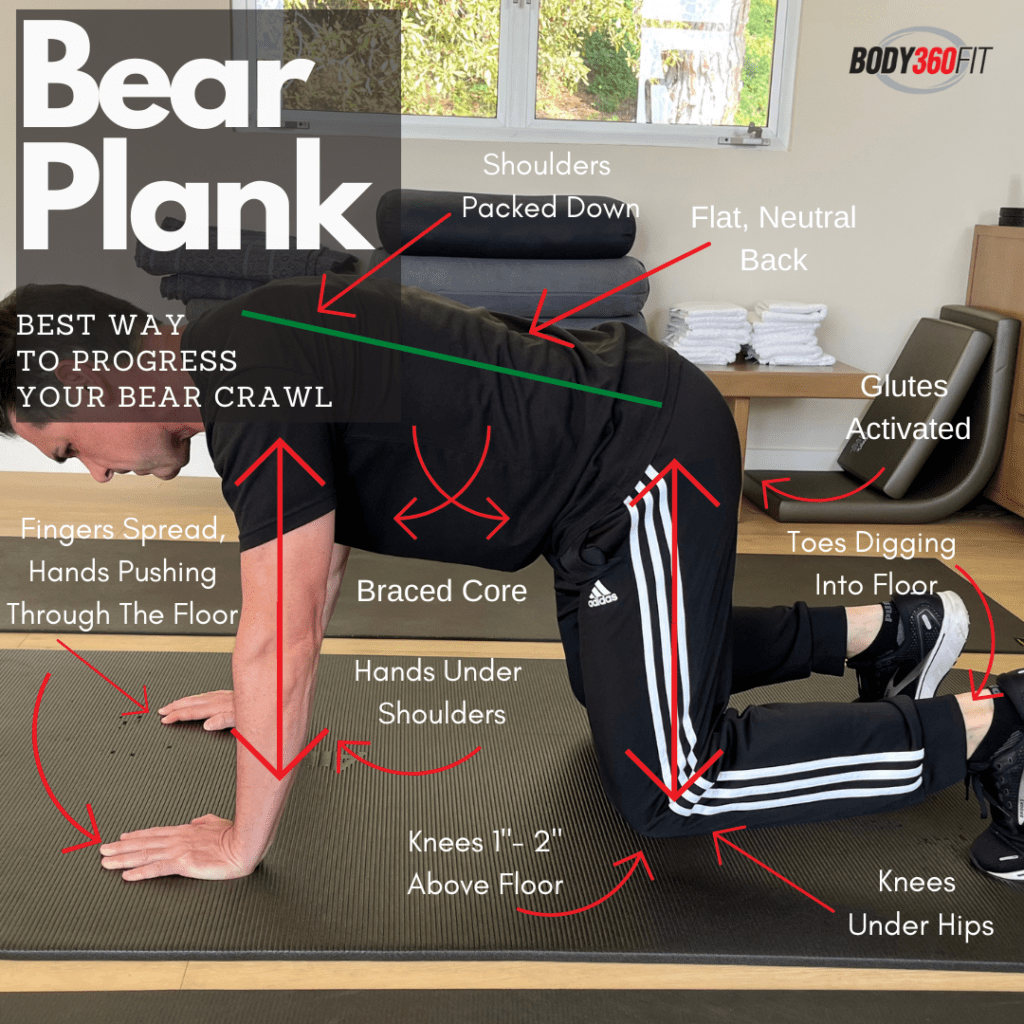
- How To Begin
Begin this exercise in a quadruped position. Hands should be placed under your shoulders. Knees should track directly under your hips. Fingers should be spread to ensure more contact with the floor. The ankles should be dorsiflexed with your toes digging into the ground.
- Form A Strict Bear Plank Position
Next, brace your core, push through your hands and raise your knees off the floor. Your shoulders should be back and and down and a neutral lumber spine should be maintained throughout. Cervical spine should be in a neutral position with your eyes looking down. Knees should hover approximately 1″ – 2″ above the floor.
- Crawling Pattern
Begin the crawling pattern by simultaneously moving your right hand and left foot. Repeat this action for the left hand and right foot and so on. Each hand and foot should move approximately 6-8″ with each stepping action. Remember keep the steps short to maintain optimal position and move in a straight line.
Pro Tip: Keep “the stepping action” of this movement pattern to a minimum. Steps should not be huge, but instead shorter initially. This will allow you to keep your lower back and butt down while keeping the pelvis in a neutral position as well. As you become more conditioned you can begin to move with a larger stepping action.
Crawling Exercise Variations
Having a tough time performing the 4 point bear crawl? No problem!
See below for best regression/progression variations.
Attention Beginners: Start with the 6 Point Bear Crawl Variation. This variation is perfect way to develop the motor control and sequencing used in more advanced versions.
Beginner Crawling Patterns
- The Bear Plank, 4 Point—AKA Quadruped Hold with Knees Elevated
- 6-Point Bear Crawl (Forward/Forward – Linear)
- 4-Point Bear Crawl (Forward/Forward – Linear)
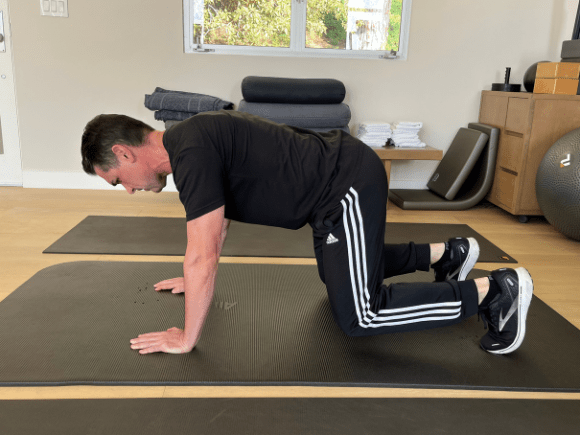
The 4-Point Bear Plank—AKA Quadruped Hold with Knees Elevated
6-Point Bear Crawl (Forward/Backwards – Linear)
4- Point Bear Crawl (Forward/Backwards – Linear)
Intermediate Crawling Patterns
- Lateral Bear Crawl (Linear)
- Lateral Crawl—AKA Tall Plank Lateral Crawl
Lateral Bear Crawl (Linear)
Lateral Crawl—AKA Tall Plank Lateral Crawl
Advanced Crawling Patterns with Weight and Resistance
- Bear Crawl with Weighted Vest
- Chain Resisted Bear Crawl
Bear Crawl Workout Integration
Here’s how you can integrate the Bear Crawl Exercise into your workout routine.
Month 1 – Weeks 1-4
Pro Tip: Begin week 1 by performing the 6 point bear crawl pattern. Progress Week 2 by performing the 4 point bear crawl pattern.
Notes: In the 6 point variation the hands, knees and feet are in contact with the floor. In the 4 point variation only the hands and feet are in contact with the floor. Your knees should hover above the floor by approximately 1-2″. Stay low!
The Bear Crawl Workout
| Day 1 | Week 1 | Week 2 | Week 3 | Week 4 |
| Bear Crawl – 6 Point (Forwards Only – Linear) | 2 x 10 yd | |||
| Bear Crawl – 4 Point ( Forwards Only – Linear) | 3 x 10 yd | 3 x 20 yd | 3 x 20 yd |
| Day 2 | Week 1 | Week 2 | Week 3 | Week 4 |
| Bear Crawl – 6 Point (Lateral – Linear) | 2 x 20 yd | |||
| Bear Crawl – 4 Point ( Lateral – Linear) | 3 x 20 yd | 3 x 20 yd | 3 x 20 yd |
| Day 3 | Week 1 | Week 2 | Week 3 | Week 4 |
| Lateral Crawl – 4 Point ( Lateral – Linear) | 2 x 20 yd | |||
| Lateral Crawl – 4 Point ( Lateral – Linear) | 3 x 20 yd | 3 x 20 yd | 3 x 20 yd |
Month 2 – Weeks 1-4
| Day 1 | Week 1 | Week 2 | Week 3 | Week 4 |
| Bear Crawl – 4 Point (Forwards/Backwards – Linear) | 3 x 20 yd | 3 x 20 yd | 3 x 20 yd | 3 x 20 yd |
| Day 2 | Week 1 | Week 2 | Week 3 | Week 4 |
| Bear Crawl – 4 Point ( Lateral – Linear) | 3 x 20 yd | 3 x 20 yd | 3 x 20 yd | 3 x 20 yd |
| Day 3 | Week 1 | Week 2 | Week 3 | Week 4 |
| Lateral Crawl – 4 Point ( Lateral – Linear) | 3 x 20 yd | 3 x 20 yd | 3 x 20 yd | 3 x 20 yd |
Month 3 – Weeks 1-4
| Day 1 | Week 1 | Week 2 | Week 3 | Week 4 |
| Chain Resisted Bear Crawl – 4 Point (Forwards/Backwards – Linear) | 3 x 20 yd | 3 x 20 yd | 3 x 20 yd | 3 x 20 yd |
| Day 2 | Week 1 | Week 2 | Week 3 | Week 4 |
| Chain Resisted Bear Crawl – 4 Point ( Lateral – Linear) | 3 x 20 yd | 3 x 20 yd | 3 x 20 yd | 3 x 20 yd |
| Day 3 | Week 1 | Week 2 | Week 3 | Week 4 |
| Chain Resisted Lateral Crawl – 4 Point ( Lateral – Linear) | 3 x 20 yd | 3 x 20 yd | 3 x 20 yd | 3 x 20 yd |
3 Common Bear Crawl Mistakes To Avoid
Do not elevate the hips too much. You do not want to be in a modified pike position. Hips and pelvis should be neutral and in line with your shoulders. Remember, to maintain a neutral mid-back/lumbar spine throughout.
Your neck should maintain a neutral position with your eyes looking down. Remember, your body follows your eyes. In this case, focus on the floor beneath you. Your hands should track directly under your shoulders while your knees track directly under your hips.
Each hand and foot should move approximately 6-8″ with each stepping action. Remember to keep the steps short to maintain optimal position.
Conclusion
In conclusion, the bear crawl exercise is one of the best animal movements to master and perform frequently to improve physical performance and build a rock solid core. I cannot reinforce the importance of crawling exercises in your workout programs enough. Do take time to learn this important skill set and include them in your periodized workout programs.
Not only will you reap the amazing benefits of this total body crawling movement, but as a result you’ll be be well-equipped to perform more advanced versions as you become stronger and more proficient with this exercise.
In final analysis, if you’re struggling to synchronize this movement, I encourage you to begin with the Bear Plank (4 Point Quadruped Hold with Knees Elevated) and then move on to master the 6 point bear crawl pattern.
In doing so, you’ll be able to sync (motor control) the left arm and right leg and right arm and left leg without having to completely support your body with just the hands and feet. If you’re unsure of the progression/regression sequence you can review it again by clicking HERE.
So once again I ask you, Bear Crawl Exercise Anyone? They’re not easy, but they’re effective! So make time for your next bear crawl session.
Until next time,
Christian Graham—NSCA-CPT, CFSC, FMS2
Functional Strength & Mobility Specialist – @body360fit
PS. Did you enjoy this “Bear Crawl Exercise Benefits” tutorial? If so, please share it with your friends on twitter, facebook and pinterest.
PPS. If you have have any questions, please leave them in the comments below or reach out via the contact form.
Latest Articles
- How Can Personal Training Help You Reach Your Goals in Los Angeles?
- Who Should Work With a Personal Trainer in West Hollywood?
- Why Is Personal Training Worth It In a Private Gym?
- How Often Should You See a Personal Trainer: Frequency Tips for Best Results in Personal Training
- What Should Beginners Know About Personal Training: Tips for Success in Your First Session

")

![Full Body Kettlebell Workout [PDF] | Body360 Fit](https://body360fit.com/wp-content/uploads/2021/01/Full-Body-Kettlebell-Workout-PDF.png)